Is DIY Floor Sanding Worth It? Costs, Risks & When to Hire a Professional

If you’re considering DIY floor sanding, the appeal is easy to understand. Hiring a sander for the weekend can look far cheaper than bringing in a professional team, especially when wooden floors already seem “good enough” underneath old finishes or worn varnish.

The difficulty is that sanding changes the floor FOREVER… yes, I’m being dramatic because it is dramatic!

A smooth, long-lasting finish really depends on pressure control, grit progression, dust management, and knowing how different floorboards react under the machine. For some smaller projects, DIY can work well. For larger spaces, valuable timber, or homes where the finish really matters, professional sanding is often the safer long-term investment.

Key Takeaways

  • DIY floor sanding can reduce upfront costs, but hidden repair costs are common.
  • Professional sanding usually delivers a smoother finish that lasts longer.
  • Over-sanding or poor grit use can permanently damage wooden floorboards.
  • Industrial dust-free systems create a cleaner, more even result.
  • DIY sanding is best suited to smaller rooms and confident DIYers.

What Is Floor Sanding?

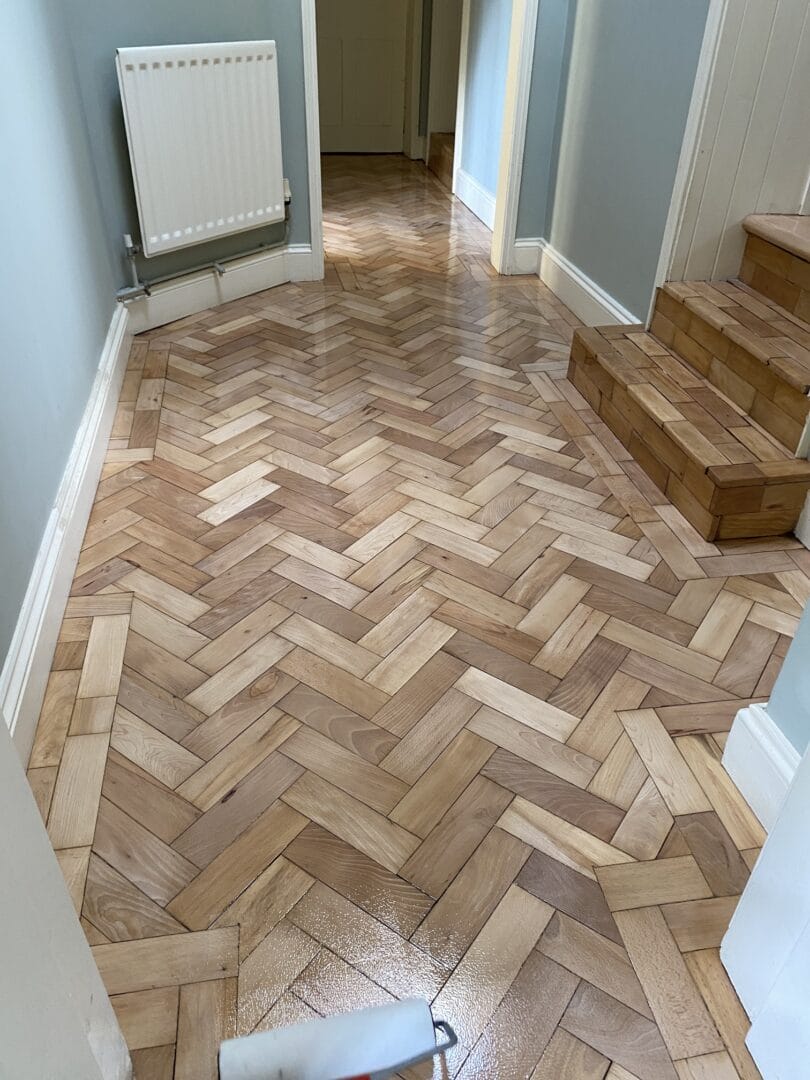
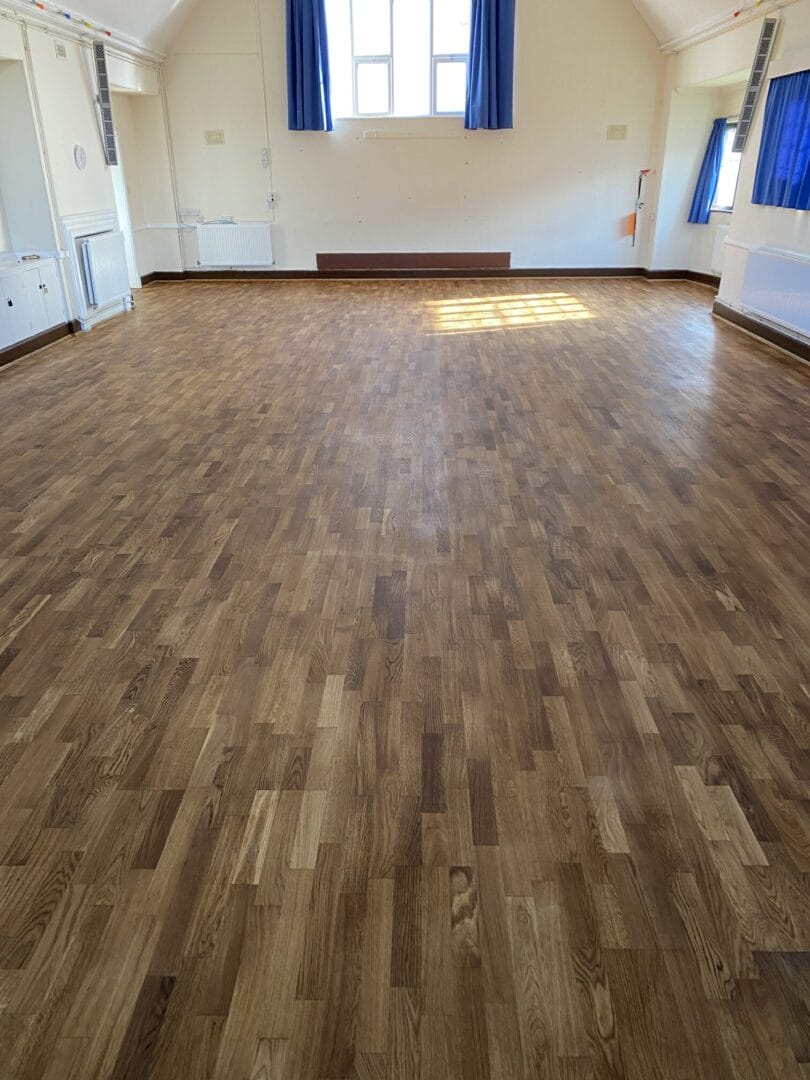
Floor sanding is the process where you remove the top layer of your wood floor using abrasive sanding equipment. The aim is to remove scratches, stains, old finishes, and uneven wear so the floor can be refinished and protected properly.

If you do it well, sanding can completely change how your room feels. Old pine floorboards can regain warmth and character, while an oak floor can look sharper, cleaner, and more refined without needing replacement.

The most important thing to understand is that sanding removes real material from the wood. Every pass of the sander takes away part of the wood’s surface. That means precision really does matter.

Uneven pressure, the incorrect grit choice, or even stopping too long in one area can leave dips, swirl marks, or permanent damage that can’t just clean it away later. Yes, It’s really, really permanent, so you have to make sure you’re really careful.

Definition and Purpose

Sanding wooden floors restores the appearance of the floor and prepares it for sealing or staining. It helps remove:

  • Surface scratches
  • Old varnish and coatings
  • Minor staining
  • Uneven wear patterns
  • Light surface damage

It also prepares the floor finish to bond properly, helping varnish or stain last longer.


Key Steps Involved

A typical sanding process includes preparing the room, repairing loose floorboards, and checking for nails or damage before any sanding begins.

The sanding itself usually works through multiple different grit stages… that’s a sandpaper process, but not as simple as it seems. Coarser grit removes old coatings and levels the floor, while finer sanding sheets refine the finish before sealing.

After the main wood floor sanding work, edging and detail sanding are completed around skirting boards and corners using an edge sander or hand sander. The floor is then cleaned carefully before staining or sealing.

laquered-beech-wood-floor-restoration-newmarket.
Trumpington-village-hall

Equipment Used

DIY sanding normally involves hiring:

  • Drum sander or belt sander
  • Edge sander
  • Orbital sander or palm sander for detailed areas
  • Sandpaper in multiple grit levels
  • Buffers and finishing tools

Professional floor sanding companies typically use industrial dust-free systems with far stronger extraction and more consistent sanding performance.


DIY Floor Sanding Costs

DIY floor sanding is usually chosen for one reason first: cost. On paper, the savings can look significant.

The reality is that the final cost often depends on how smoothly the project goes, how much sanding experience you have, and whether mistakes need correcting later.

Equipment Rental Costs…

Typical sander hire costs in the UK include:

  • Drum sander rental: £40 to £80 per day
  • Edge sander rental: £30 to £50 per day
  • Orbital sander: £20 to £40 per day

For an average DIY floor sanding project, equipment costs alone often reach £150 to £400 over several days.

Material Costs…

Materials add up quickly when you’re sanding back your wood floorboards properly.

Typical costs include:

  • Sandpaper and sanding belts: £50 to £150
  • Wood filler: £20 to £60
  • Floor varnish or stain: £50 to £300
  • Brushes, rollers, and applicators: £20 to £50
  • Safety gear and masks: £20 to £100

Different types of wood also affect material use. Engineered wood may need finer sanding with more caution, while older pine floorboards can require far more preparation and filling.

Total Estimated DIY Cost…

For smaller rooms, many DIY sanding projects cost between £400 - £800, including equipment, finishes, and consumables!

For a full house or entire floor area, costs can quickly rise to £900 to £2,000 or more, especially if additional sanding sheets, repairs, or refinishing become necessary.

Hidden DIY Costs

This is the area many homeowners underestimate.

A floor sanding project often takes far longer than expected. Dust from sanding spreads easily, even with modern extraction systems, and fatigue becomes a genuine issue after several hours using a heavy floor sander.

We regularly see homeowners contact us after:

  • Uneven sanding marks appear.
  • The sander can’t reach awkward edges cleanly.
  • The floor looks patchy after varnish.
  • Incorrect grit progression leaves visible scratches.
  • Staining the floors highlights swirl marks.
  • Gouges appear from pausing the machine for too long.

For a 1,000 to 1,200 sq ft home, DIY costs can easily approach £1,500 to £2,500 once sander hire, finishes, repairs, and lost weekends are considered.

Professional sanding for the same size property may cost £3,500 to £5,500, but that usually includes repairs, sanding and sealing, industrial dust extraction, labour, and a finish designed to last substantially longer.


Professional Floor Sanding Costs…

Professional floor sanding costs are a bit more upfront, but it often delivers better long-term value, especially for high-traffic homes or premium flooring.

Average Cost Per Square Metre

In the UK, professional floor sanding typically ranges between:

  • £20 to £65 per m²

Pricing depends on:

  • Type of wood
  • Floor condition
  • Room access
  • Repairs required
  • Finish selected
  • Parquet floor complexity

Typical Total Project Costs

A small room may cost between £1,000 and £2,500, depending on preparation and finish requirements.

A full home project can range from £3,500 to £7,500 or more for larger properties or heritage wooden floorboards.

Linton-Free-Church-Pine-Parquet-floor-restoartion-project-art-of-clean-cambridg

What’s Included in Professional Services

Professional floor sanding usually includes:

  • Full floor inspection
  • Repair work and board stabilisation
  • Dust-free sanding systems
  • Industrial sanding equipment
  • Correct grit progression
  • Professional-grade floor varnish
  • Sand and finish the application
  • Aftercare advice
  • Warranty or workmanship guarantee

The biggest difference between DIY and professional sanding is often consistency. A professional floor sanding team knows how different floors react and how to adjust the sanding process before problems appear.


Cost vs Long-Term Value

This is where the numbers become more balanced.

A DIY finish may last around two to four years before visible wear, patchiness, or refinishing your floors becomes necessary again.

A professional finish commonly lasts seven to ten years or longer with proper care.

If a DIY job costs £1,800 and lasts three years, the cost per year is roughly £600.

If professional sanding costs £4,500 and lasts nine years, the cost per year is closer to £500, often with a noticeably better appearance of the floor throughout that time.

Factor DIY Professional
Upfront Cost Lower Higher
Time Required 3 to 5 days 1 to 2 days
Finish Quality Can vary Consistently high-quality
Lifespan 2 to 4 years 7 to 10+ years
Risk Level Higher risk of mistakes Lower risk
Equipment Rental-grade Industrial-grade

Risks of DIY Floor Sanding

Most DIY sanding mistakes happen quietly at first. The floor can seem fine until the varnish goes down or sunlight catches uneven sanding patterns later.

Common Mistakes

One of the biggest issues is incorrect grit progression. Starting too aggressively or skipping grit stages can leave scratches visible beneath the final floor finish.

Another common problem is sanding against the grain of the wood. This can create visible marks across the wooden floor that become difficult to hide later.

Using the edging sander unevenly is another frequent issue, especially where the rest of the floor blends into corners.

Structural and Cosmetic Damage

Over-sanding can permanently thin floorboards, particularly on older pine floors or engineered oak flooring.

We occasionally see floors where repeated DIY sanding has reduced the lifespan of the timber significantly. Deep dips near doorways, uneven transitions between rooms, and excessive sanding near edges are all difficult and expensive to correct.

Professional sanding is not just about making floors look great. It is also about protecting how much usable wood remains for future restoration work.

Health and Safety Risks

DIY sanding creates large amounts of airborne dust. Even with extraction systems, fine particles settle throughout the property.

There are also risks linked to:

  • Dust inhalation
  • Sealant fumes
  • Noise exposure
  • Heavy equipment handling
  • Damage the machine from incorrect use.

Many homeowners underestimate how physically demanding much sanding can be over consecutive days.

Financial Risks

One contractor insight we often share with customers is this: the most expensive sanding jobs are usually the ones that have already been sanded badly once.

Repairing gouges, correcting uneven sanding, or replacing damaged floorboard sections can quickly erase any original savings from the DIY job.

When DIY Floor Sanding Is Really Not Worth It…

DIY floor sanding can still make sense in certain situations.

Checklist:

  • Small spare rooms or low-traffic spaces
  • Floors are already in poor cosmetic condition.
  • Limited budget with flexible timing!
  • Previous woodworking or DIY sanding experience.
  • Willingness to accept less-than-perfect results!
  • Confidence using a drum sander and edge sander!
  • Simple layouts without complex parquet floor patterns

For practical DIYers working on a small kitchen floor or spare bedroom, the project will absolutely feel worthwhile! A great achievement because the transformation in wood floors is so beautiful!


When to Hire a Professional

For larger spaces or high-value flooring, professional sanding usually provides far more reassurance.

If you have engineered wood, delicate parquet floor layouts, uneven wooden floorboards, or want a flawless finish that fits the rest of your home properly, hiring a professional is often the safer route.

This matters so much more in open-plan homes where light exposes every sanding mark and inconsistency.

Usually, in homes like yours, the safest next step is comparing like for like… Ask what preparation is included, whether repairs are handled properly, how dust extraction works, and what finish lifespan you can realistically expect.

The right professional floor sanding service should leave the floor feeling calmer to live with, not like another project waiting to be corrected later.


Time Comparison: DIY vs Professional

Time is one of the highest hidden costs in all DIY floor sanding projects.

Most homeowners need three to five days to sand a floor properly across an average property. That includes preparation, sanding, cleaning, staining, drying, and wiping the floor between coats.

Professional teams can normally complete up to 1,000 sq ft per day, depending on layout and condition.

Why Time Matters

Longer projects mean:

  • More disruption to your daily life!
  • Furniture is displaced for so much longer.
  • Increased fatigue
  • Higher chance of sanding mistakes
  • More time away from weekends or work

For almost all homeowners, the real decision is not simply cost… It is whether the time, effort, and risk still feel worthwhile once the project begins.


Final Verdict: Is DIY Floor Sanding Worth It?

DIY floor sanding can absolutely reduce upfront costs, especially for smaller spaces and experienced DIYers.

The challenge is that sanding wooden floors is far less forgiving than many people expect. Mistakes are often permanent, and the difference between an average finish and a professional one becomes much more obvious over time.

For most homeowners, especially those with larger rooms, premium flooring, or open-plan spaces, professional sanding offers better long-term value, a longer-lasting finish, and far less risk.

If you are still unsure, start by comparing the true cost of your time, the lifespan you want from the floor, and how important the final finish is to the way your home feels.

We’re here when you’re ready.


Article Sources

Author Experience and Expertise

At Art of Clean, we regularly work with homeowners who originally planned a DIY sanding project before realising how quickly things can become difficult once the machinery starts moving.

The most common issue we see is uneven sanding around edges and transitions between rooms. Often, the floor initially looks acceptable until varnish is applied or natural daylight highlights sanding marks across the wooden surface.

We also see many cases where homeowners have used overly aggressive grit or repeated sanding attempts on engineered wood, leaving very little material for future restoration.

Good floor sanding is not simply about removing old varnish. It is about controlling the sanding process carefully enough to protect the character, strength, and lifespan of the floor underneath.

Frequently Asked Questions

Answers to common questions about our Is DIY Floor Sanding Worth It? Costs, Risks & When to Hire a Professional service.